- #_shellntel Cybersecurity Blog
- Posts
- Build Your Own Pentest Tools: Keylogger
Build Your Own Pentest Tools: Keylogger
Dylan Reuter
February 23, 2026

When it comes to physical pentesting, sometimes a few moments of physical access can yield big results. Every hacker usually has a plethora of various tools and gadgets, and I’m no different. But something I’ve always loved is creating my own stuff. Whether it’s writing my own stealthy C2 dropper for remote access, creating my own BYOVD exploit, or diving into the world of hardware, there is just something to be said about creating your own stuff.
In this article, we will build a hardware keylogger that saves keystrokes to an SD card. The total build price will be about $70. You may be thinking, “can’t I just buy a keylogger for less money that is more discreet and has more features?“ Why yes, yes you can. But where is the fun in that?!
The first order of business is picking the microcontroller to use. The board needs to be able to act as both a USB host and a USB device. There are a few different options, but I ended up going with a Teensy 4.1 due to its size, power, and available libraries. The complete build list and requirements are as follows:
Hardware
Teensy 4.1 - https://www.amazon.com/dp/B088JY7P2H
128 GB micro SD card - https://www.amazon.com/dp/B08TJRVWV1
USB A to Micro USB cable - https://www.amazon.com/dp/B0719H12WD
Female USB A cable - https://www.amazon.com/dp/B06Y5KZC9W
Software
Arduino IDE - https://www.arduino.cc/en/software/
Teensyduino - https://www.pjrc.com/teensy/td_download.html
Teensy keylogger ino file - https://github.com/shellntel/teensy_keylogger
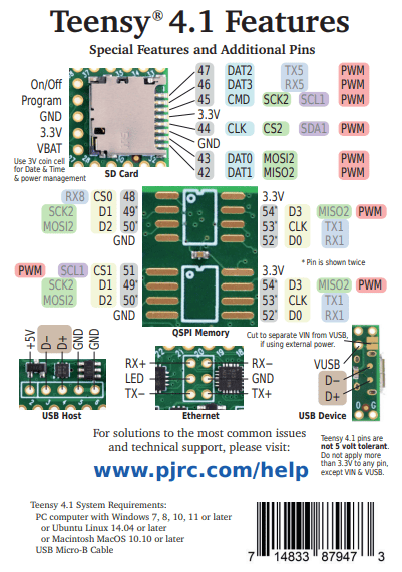
You can view detailed information on Teensy 4.1 here, but here is the pinout for reference:
The first step will be soldering pins to the board for the female USB host cable and inserting the SD card.

Next, we’ll open up teensy_logger.ino in Arduino IDE and connect the micro USB to the Teensy board and the other end to the computer.
Under Boards Manager, ensure that Teensy is installed.

Next, under Library Manager, install “Keyboard”. This will allow the Teensy board to send keystrokes to the computer.

Next, navigate to Sketch → Include Library and select USBHost_t36, SD, and SPI.
Now, moving on to the teensy_logger.ino file. I created this based on the KeyboardForward.ino example file in the USBHost_t36 library. I added logic to save keystrokes to the SD card before forwarding them, and removed a lot of unnecessary/unused code. I also added a <BACKSPACE> entry when the backspace key is pressed for better logging.
If you want to add additional functionality or test keystroke capture, ensure that you uncomment the #define DEBUG line as well as select “Serial + Keyboard + Mouse + Joystick“ under Tools → USB Type. This will ensure that the keyboard forwarding functionality is working while still enabling Serial communication to see debugging output. After connecting a keyboard to the female USB host cable, you can connect to the Serial Monitor and view the output.

Once you are finished with any modifications or testing, set the USB Type to “Keyboard” and upload the code to the board.

Now, to test everything, connect your keyboard to the female USB connector, and connect the Teensy's USB cable to your PC. The computer should recognize it as a keyboard. After entering some keystrokes, pull the SD card from the Teensy and read the contents. There should be a keystrokes.log file containing the captured keystrokes!

Now let’s talk about the enclosure. One option is you could create a sleek, inconspicuous case with a 3D printer. However, I don’t own or have access to one. So instead, I decided to peruse the aisles of my local hardware store looking for the next best option.
What I settled on was some 1/2” conduit and two 1/2” adapters.

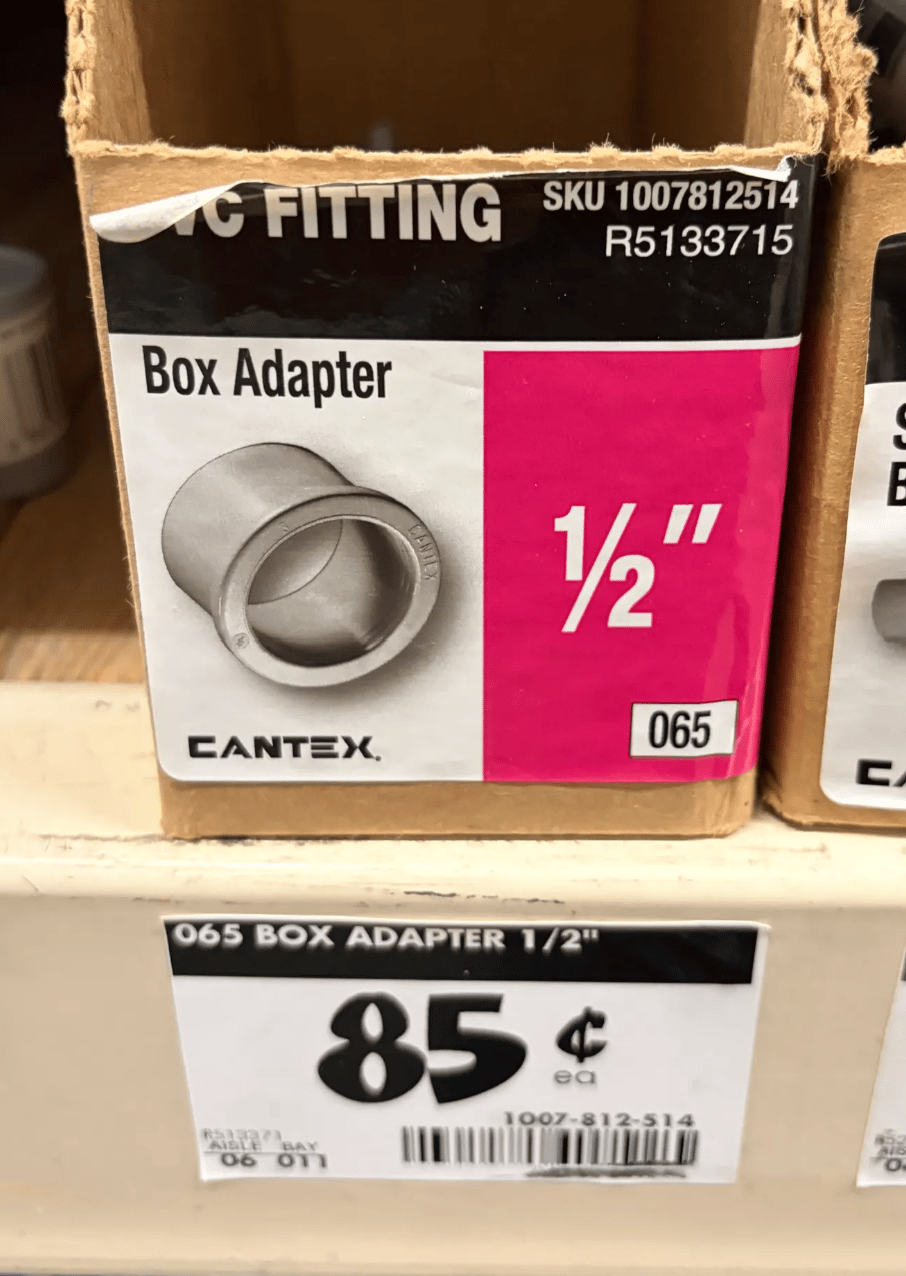
The conduit fits the Teensy perfectly, is discreet enough, and at about $6, I consider it pretty not bad!

Finished product:

Thanks for reading, and remember, if you didn’t build it yourself, it’s not really yours!